You are here: 4. Point of Sale > 4.3. FILE Menu: Master File Maintenance > 4.3.1 File - Cash Register > 4.3.1.4. Cash Register File Update Screen - Menu Options > Signature Capture
Signature Capture

You use the SIGNATURE CAPTURE menu option on the Cash Register File Update screen to setup a cash register to capture customer signatures as a way to provide electronic proof of delivery. Customer signatures, along with the date and time, can then be printed on sales invoices.


Technical Tip

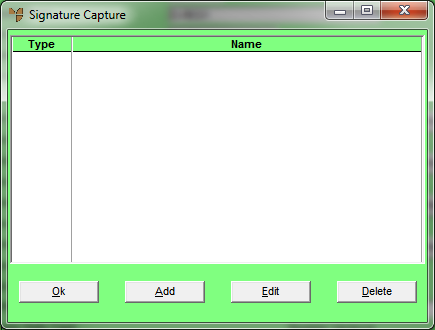
Signature Capture is an optional Micronet module. This option is only available if your company has purchased this module and you have enabled Signature Capture in company registration (refer to "Edit Company - Registration").

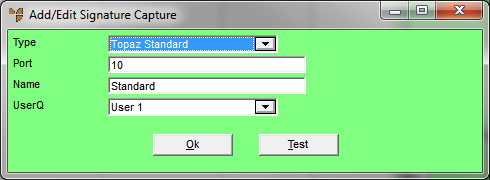
To use Signature Capture, the cash register must be connected to a Topaz signature pad and have the SigSock software installed – see "Setting up Topaz Signature Capture" earlier in this manual.

To setup a cash register for signature capture:

  1. Add a new cash register or open an existing one.

Refer to "Adding a New Cash Register" or "Updating a Cash Register".

  1. Select SIGNATURE CAPTURE.

Micronet displays the Signature Capture screen.

  1. If you want to:

If you selected to add or edit a signature capture device, Micronet displays the Add/Edit Signature Capture screen.

  1. Complete the following fields:


Field

Value


Type

Select the type of signature pad you are using:

  • Topaz Standard – a device with a standard screen and a direct connection to the cash register
  • Topaz LCD – a device with an LCD screen and a direct connection to the cash register
  • Topaz Terminal Services – a device with a network connection to the cash register.


Port

Enter the COM port number for the signature pad – see "Setting up a Signature Pad for RDP" for information on finding the COM port number.


Name

Enter a unique name for the device.


UserQ

Select the user defined question which has been setup to store customer signatures. This UDQ must be setup on the POS Header file.

  1. Select the Test button to test Micronet's connection to the signature capture device.

Micronet displays a blank Signature Capture screen.

  1. Write your signature on the signature pad.

If everything is working correctly, your signature should be displayed on the Signature Capture screen.

  1. Select the Cancel button to return to the Add/Edit Signature Capture screen.
  1. Select the Ok button to return to the Signature Capture screen
  2. Select Ok again to return to the Cash Register File Update screen.
  1. In the Signature Capture field, select the signature capture device you have just setup.

  1. Select FILE | SAVE.

You must now use the Report Generator to include the UDQ that stores the signature capture image on your invoice or other report format as required – see "Adding Image Fields".

You also need to update the Debtor master file for customers that will use signature capture. You need to set the Signature Capture field on the Debtor File Update screen - Extra tab to either Yes Forced if signature capture is mandatory or Yes Optional if signature capture is not mandatory – see "File - Debtor - Extra".